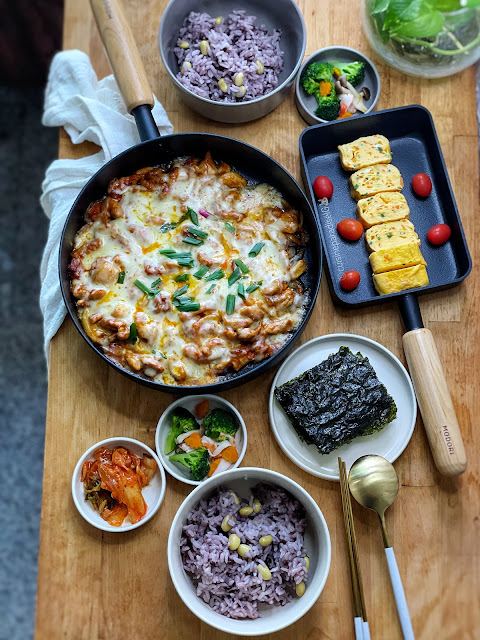
Latest Updates @ My Kitchen Pantry

Friday, 10 February 2012

Cranberry And Banana Walnut Cake

Pin It

Last Friday we kick off our 1st Photo Friday with Pineapple Upside-down Cake which i adapted from "Just One Cookbook" and for this week I would be sharing this delicious Cranberry And Banana Walnut Cake from Wen's Delight who is also the host for January Aspiring Baker event on Auspicious Dishes for CNY(Jan 2012). If you need more inspiration for Chinese New Year dishes you can take a look at the roundup HERE.

I get to know Wendy's blog on Wen's Delight a few year back through blogs hopping. She is very generous on sharing recipes of her wonderful bakes and I have indeed tried a few recipes on her blog too. Last week since I have some extra banana and cranberry in the panty I decided to try out this recipe as her cake look so yummy on her post.


CRANBERRY BANANA CAKE


Pin It
This recipe is quite a standard method with creaming butter and sugar till light and creamy before adding one egg at a time and beat till combine. Whereas the mashed banana and dried ingredients are to be fold in alternatively till the cake batter is well mixed. If compared the outlook and internal texture of the cake wendy's version is definitely much better than mine as my seems to be a bit over mixed/baked with bits of crumbs falling. 


Recipe adapted from Wendy of Wen's Delight, HERE.

(Make: 7" Square Tin | Preparation: 10 minutes | Cooking: 50 minutes)

Ingredients:
230g Unsalted Butter, soften
2 Tablespoons Honey (optional)
1/2 Teaspoon Vanilla Extract
4 Large Eggs
140g Castor Sugar
270g Self-raising Flour
1/4 Teaspoon Baking Soda
1/4 Teaspoon Salt
240g Ripe Bananas, mashed
50g Chopped Walnuts
2 Tablespoons Dried cranberries, roughly chopped
1 Tablespoon of rum liquor

You can refer the steps on making the cake at Wendy's post HERE.

Wendy has a large collection of cake recipes (about 124 recipes) for you to take your pick so if you are keen to try out more recipes from her site. You can refer to this link HERE. Till then have a great weekend everyone!!!


Read More...

Thursday, 9 February 2012

Thai Green Curry Roast Chicken

Pin It

The quickest way to enjoy a bowl of comfort curry dish at home is by using curry paste that is easily available at major supermarkets. In Singapore there are many different types of curry pastes ranging from Chinese(Singapore curry, nonya curry), Malay(rendang, kari ayam), Indian(fish curry), to international choice of Japanese, Thai and etc.

Here we are using Thai Green Curry paste which is best with chicken(recipe HERE), pork or seafood whereas Thai Red Curry works best with beef, lamb or oily fish such as salmon.


THAI GREEN CURRY ROAST CHICKEN


Today instead of cooking the usual Thai Green Curry Chicken with Vegetables, I decided to use the green curry paste to marinate the chicken and roast it in the oven. In order to enhance the flavour, I added extra lemon grass and kaffir lime leaves to infuse the taste of the chicken. And you see from the photos, to speed up the cooking time as well as for easy serving, I actually portion the chicken into quarters rather than bake it whole.


(Serves: 4 | Preparation: 10 minutes | Cooking: 50 - 60 minutes)

Ingredients:
1.2kg Whole Chicken, cut into quarter
1 Lemon, halved
1 Packet(100g) Dancing Chef Green Curry Paste
4 Slices Fresh Ginger
3 Garlic Cloves, lightly pound
6 Stalks Lemongrass, cut into sections and bruised
6 Kaffir Lime Leaves, torn

Method:-
1. Preheat oven to 180°C/160°C fan-forced. Rise chicken under cold running water, trim any excess fat, pat dry with paper towel and set aside.

2. Juice half lemon and cut the remaining lemon into thin slices. Combine curry paste and lemon juice in a bowl and stir till combined.

3. Arrange ginger, garlic, lemon and half of the lemongrass and kaffir lime leaves on baking dish. (if you are using whole chicken, stuff all the mentioned ingredients into the chicken cavity).

4. Rub outside and under skin of chicken with curry paste mixture and arrange them on top of the lemongrass mixture.

5. Top remaining lemongrass and kaffir lime leaves on the chicken and roast chicken, basting occasionally, for about 1 hour or until juices run clear when thigh is pierced with a skewer.

6. Cover loosely with foil and stand for 5 - 10 minute and serve with steamed rice.

Tips:-
~ You can replace whole chicken with chicken maryland or chicken wings for quick cooking or finger food.

~ You can use any brand of Green Curry Paste which yield about 2 - 2.5 tablespoons to marinate the chicken.


We all love the taste of this dish especially with the sweet aroma from the lemongrass which makes it very appetizing. The adding of the Lemon and juice also act as a tenderizer for the chicken and at the same time tone down the spiciness of the curry. So if you are looking for some party food ideas I suggest you could replace the whole chicken with mid-joints or drumsticks and I am sure your guests would be impress this quick and easy finger licking Thai Green Curry Roast Chicken.

Till then, stay tune for today's Photo Friday post on Cranberry and Walnut Banana Cake! Cya.


Read More...

Friday, 3 February 2012

Teochew Style Steamed White-spotted Rabbitfish

Pin It

Every year before and during Chinese New Year (CNY) period you would definitely be able to see this auspicious "White-spotted Rabbitfish(白肚鱼/拜年鱼)" available at all wet market fish stalls as well as the seafood sections at major supermarkets. These fish taste especially delicious during this season and they are also big in size and comes with roes that are particularly relished too.

Last year I have shared with you a similar Teochew style recipe known as "Pan-fried White Spotted Rabbitfish With Leeks"(recipe HERE) whereas for this year it would be the steamed version which consists similar ingredients.


TEOCHEW STYLE STEAMED WHITE-SPOTTED RABBITFISH


My dad used to cook this dish and according to my mum who taught me this recipe over our phone conservation, she mentioned that in order to maintain the texture and taste of the fish it would be good if I blanched it in boiling water before steaming. (in this case the fish is half cooked and it would not release so much water during steaming which will affect the texture of the meat)

So since I wanted to achieve what my dad used to cook for us, I follow my mum's suggestion and steps to dot and surprising it works well. My steamed white-spotted rabbitfish taste almost 90% like my childhood food. Now at least I have master another traditional food in our household which might comes in handy one of these days.


(serves: 2 | Preparation: 10 minutes | Cooking: 10 minutes)

Ingredients:
2 Large White-spotted Rabbitfish(白肚鱼/拜年鱼)
2 Stalks Chinese Leek, cut into diagonally sections
2 Slices of Ginger
3 Garlic Cloves, finely minced
1 Tablespoon of Oil
1/2 Tablespoon of Oyster Sauce
50ml Water


Method:-
1. Clean and rinse the fish, cut a diagonal slit on the fish(refer to the photo stated no. 1 above) to shorten cooking time.

2. Add water to about 1/4 level of the pan and bring it to boil before blanched the fish for about 20 seconds on each side. Remove, rinse, pat dry using kitchen paper towel. Stuff the ginger slice into the stomach area(to get ride of the fishy smell) of each individual fish and set aside on steaming plate.

3. Next saute minced garlic with oil till fragrant, add in leeks and continue to fry for another 20 seconds, before adding in the oyster sauce and water.

4. Simmer the mixture over low heat for another 1 minute or so, remove and drizzle it evenly on top of the prepared fish.

5. Prepare a steamer with boiling water and steam the fish for about 7 minutes or till fish is cooked through. (can take reference from the eyes which would turn white and puffed out) Serve immediately with steamed rice or porridge.


Chinese New Year is almost coming to the end on 06 February 2012(the fifteen day) and I would be submitting my last CNY dish Teochew Style Steamed White-spotted Rabbitfish to this month Aspiring Baker #15 - Auspicious Dishes for CNY (January 2012) that is hosted by Wen of Wen's Delight.

Have a great weekend everyone! Cheers! Can't wait for our Chinese New Year Steamboat Gathering with all my foodie friends tomorrow!!!!


Read More...

{Photo Friday} Pineapple Upside Down Cake

Pin It

I love to spend hours looking at food photos from either food magazines or food blogs. Upon looking at those mouthwatering photos it could actually motive oneself to try working on the recipe(s) especially those that requires simple ingredients and comes with step-by-step photos. Today I am sharing a Photo Post on a Pineapple Upside Down Cake recipe that I try from Nami's blog @ Just One Cookbook. If you have follow this blog you would remember she is also the one who inspired and taught me how to make the Japanese Steamed Cake (recipes on Mushipan).

For this 1st Photo Friday entry, I would like to share with you a delicious cake recipe that I bake from Nami's blog.


PINEAPPLE UPSIDE DOWN CAKE


Just a few days ago I saw a lot of beautiful fresh pineapples available at the wet market and on the same day so coincident Nami also shared a post on her Pineapple Upside Down Cake which she made for her husband. So without hesitate I know I must go and get hold of the pineapple to try her recipe.

Although I am don't like to eat pineapple as a fruit on it's own(because I am afraid of sour and it's tongue bite feeling) but I love it when it is used to make pineapple jam, pineapple tarts, achar(fruit salad) and etc. Thinking about it I still miss Sherie's(maameemoomoo) pineapple salad that she share with me during my last visit to her place.


Recipe adapted from Nami's @ Just One Cookbook HERE.

(Make: 8" Round Tin | Preparation: 15 minutes | Cooking: 50 - 60 minutes)

Ingredients:
1 Pineapple, (skin removed, halve and core)
150g Caster Sugar
1/2 Cup Water
86g Unsalted Butter, soften

Batter for Cake:
114g Unsalted Butter, melted and cooled
140g Plain Flour
1 Teaspoon baking powder
1/4 Teaspoon Salt
2 Eggs
3 Egg Yolks
200g Caster Sugar
1 Teaspoon Vanilla Extract

Although there is a small hiccups while preparing the caramel pineapple but overall the cake was perfect with it's soft, sponge cake like texture that tops with delicious golden pineapple slices. This is just too good for an afternoon tea-snack and I have two slices with my favourite fruit tea. If you are keen in trying out this recipe, do head over to Nami's blog and check out her step-by-step recipe on making this mouthwatering cake HERE.

Till then have a great weekend everyone! Stay tune for next Photo Friday recipe again.


Read More...

Wednesday, 1 February 2012

Braised Bee Hoon With Pumpkin & Prawns

Pin It

With Chinese New Year(CNY) celebration still going on until next Monday, 06 February 2012(the fifteen day of Chinese New Year). Most households are still in the festive mood on preparing auspicious CNY dishes with ingredients such as Abalone, Mushrooms, Black Moss, Sea Cucumber and etc.

In this post I am using simple ingredients such as rice vermicelli, pumpkin(金瓜 - 金玉满堂), prawns(嘻哈大笑) and mushrooms to prepare a very colourful and auspicious New Year noodle dish for the family.


BRAISED BEE HOON WITH PUMPKIN


This dish is prepared using Happy Call Pressure Pan(HCP) but as mentioned previously you could always use the same ingredients and method with your normal pan. I love the way this dish is prepared as compared to the usual stir-fry method where the rice vermicelli(bee hoon) might sometime tends to be a bit burnt or dry in texture. This one prepared by HCP is moist and yet "Q" in texture and not too mushy.  Most importantly the stove top is not oily and my bee hoon won't be flying around like what it does during stir-fry.


(serves: 2-3 | Preparation: 10 minutes | Cooking: 15 minutes)

Ingredients:
1/3 Pack (150g) Dried Rice vermicelli (Bee Hoon - 米粉), soak till soften
1 Bunch of Choy Sum, cut into sections
2 Taiwan Sausage, sliced
150g of Shelled Prawns
100g Pumpkin, thinly shredded
3 Medium Shiitake Mushrooms, sliced
4 Cloves Garlic, minced
1 Teaspoon Chicken Powder Seasoning
200ml Chicken Broth/Hot Water
Salt to taste


Method:-
1. Preheat Happy Call Pan(HCP) for 30 seconds, fry the sausage(pan close) for about 1 minute (give it a quick stir after 30 seconds) till slight golden brown. Remove and set aside.

2. Add in HALF of the minced garlic together with 1/2 tablespoon of cooking oil and saute for a few seconds before tossing in the mushrooms.

3. Pan close and let it cook for 30 seconds before adding the prawns. Give it a quick stir and close back the pan again to cook for another 1 minute or till prawn changed colour.

4. Arrange vegetable on top of the mixture, season it with chicken stock powder, close the pan(lock) and cook the mixture for another 1 minute. Give it a quick stir, remove and set aside.

5. Using kitchen paper towel, wipe off any residual from the pan. Add in 1/2 tablespoon of oil and saute the remaining HALF of the minced garlic till fragrance, add in the drained vermicelli. Close the pan and cook for 30 seconds.

6. Next give the vermicelli another quick stir, pour in chicken broth/water and cook(pan lock) for another 1 to 1.5 minutes, before tossing in the shredded pumpkin and the rest of the cooked ingredients.

7. Lastly braised the whole mixture for another 30 seconds or so and season it to taste with salt if needed.

Tips:-
~ Drained the soaked vermicelli ahead before cooking.

~ If the vermicelli mixture is too dry at "step 6" you can add in 50ml more of stock/water.


I would be submitting this Braised Bee Hoon With Pumpkin and Prawns dish to this month Aspiring Baker #15 - Auspicious Dishes for CNY (January 2012) that is hosted by Wen of Wen's Delight.


Read More...